söndag 10 november 2019

The professor

Hello and welcome,
Today I'm showing this card made for my wonderful friend and Ally's Angels teamie MariannI wanted to surprise her with a steampunk Birthday card and I have used the professor stamp from Tim Holtz (TH) along with some other cool TH details. 

This is also my design team project for Ally's Angels and the new challenge that starts today. The theme is anything goes. My teamies makes the most beautiful cards so pop over and have a look.


My card is 15,5x21,5 cm (approx. 6x8,3 inch). The professor is made with the stamp set CMS373 from Tim Holtz. I started by coloring gloss paper using walnut stain, vintage photo, pumic stone and rusty hinge oxide sprays and then used distress micro glaze on top and wiped off with dry cloth. When dry I stamped the professor with Archival ink jet black and fussy cut. The black hat is from the same stamp set as the professor and I stamped it onto black alcohol ink paper using archival ink monarch orange. It leaves just enough colour for me to see the lines to be able to fussy cut the hat. I then run it through my cuttlebug using the foundry 3D embossing folder and then used a 3D cushion to glue it in place.
I die cut the steampunk parts in chipboard and used black gesso, sanded the edges and colored the edges with arhival ink monarch orange. I then die cut the cogs also in chipboard and colored them with archival ink rotting soil, vermillion and monarch orange. I used a little distress ink ground espresso on top before sanding them. I have also used acrylic paint from Deco Art. I just used a small brush and the color quinacradone gold to give the pieces an even more rusty color. I treated all the bolt heads the same way. 
The clock behind the professor is a stamp from the set distinguished stamped onto kraft, fussy cut, inked with distress ink ground espresso and distress collage medium on top. The ribbon is colored with archival ink jet black and rotting soil then used some oxide spray rusty hinge on top. The buckle is from Tim Holtz and the bolt heads are die cut and treated the same way as the other bolt heads above. 
All metal decorations are Tim Holtz idea-ology and colored with distress crayons.

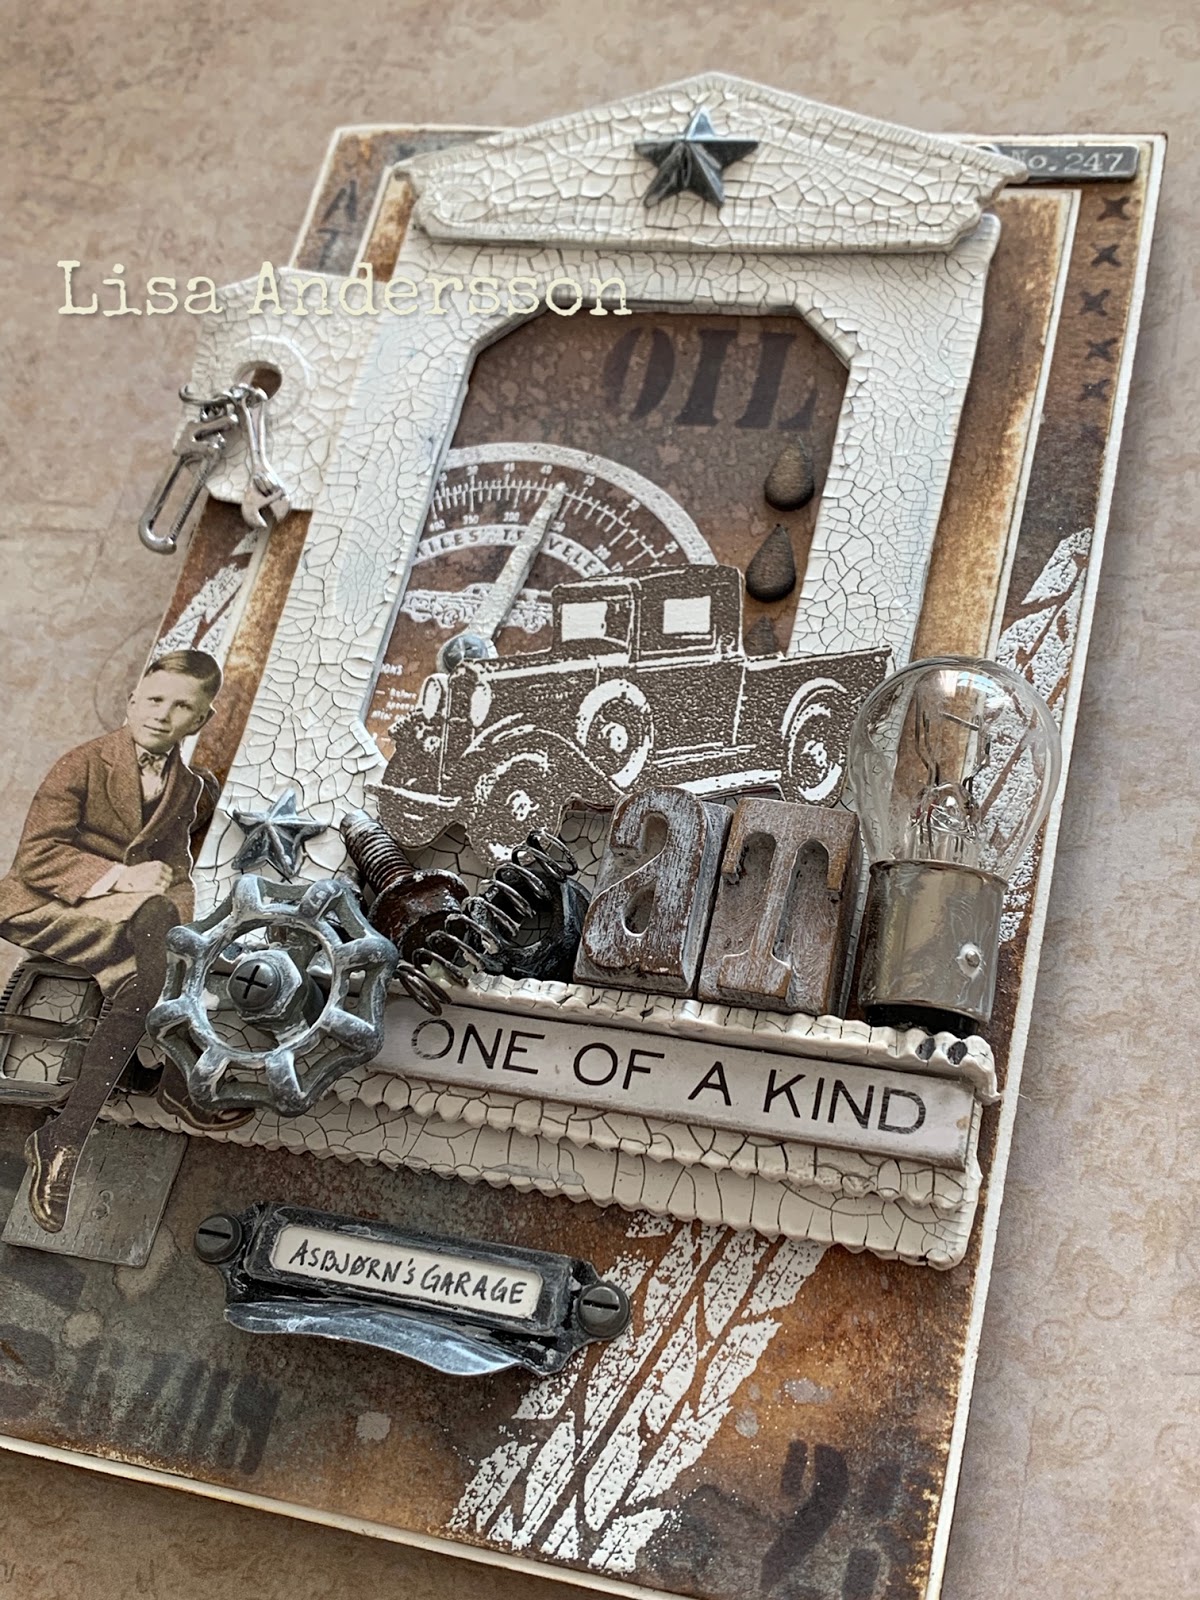
To create the background I used design paper from Tim Holtz's paper pad abandoned. I cut two panels of this paper and sewed around the edges with my sewing machine and used distress ink black sooth through the stencil schoolhouse (that's the bigger letters just behind the professor, the smaller letters on the left hand side is the design paper). I had a left over piece from the ribbon so glued it on the upper part of the background panel. 


For my other layers I used black metallic craft and sanded the edges, grey core'dination cardstock and corrugated cardstock. The latter was actually mint green from the beginning, I had run out of the brown kraft ones so I have colored it with distress paint tarnished brass, walnut stain and distress ink black sooth. Behind I have a layer of corrugated packing colored with oxide spray rusty hinge and used distress black sooth for the edges. The base is made with watercolor paper wish I also folded to create the inside of the card. To get the black matte surface I used black gesso and then sanded the edges. The inside and back side is colored with distress oxide sprays, but have no photos to show.

The happy birthday sentiment is embossed in the color tea dye on black alcohol ink paper and fussy cut. Love the black alcohol ink paper. The matte surface is fantastic.

Thank you for stopping by and thank you all who leave me such kind comments, they mean the world to me.

Hugs, Lisa


PRODUCTS USED

From Tim Holtz
Dies: cogs, steampunk parts, foundry 3D impresslit
Stamps: CMS373 The Professor, CMS371 Distinguished
Stencil: THS011 Schoolhouse
Idea-ology: ribbon, mini hardware pull, hardware heads, measurement, buckle, wheel, pen nib
Distress oxide spray rusty hinge, pumic stone, walnut stain, vintage photo
Distress ink black sooth, ground espresso
Distress crayons black sooth, tea dye, gathered twigs, rusty hinge
Distress embossing powder tea dye
Metallic kraft, black
Core'dination cardstock, grey

From Ranger Archival ink jet black, monarch orange, rotting soil, vermillion

From DecoArt
Acrylic paint quinacridone gold

Other products
Corrugated cardstock
Corrugated packing


lördag 9 november 2019

Curiosity

Hello and welcome,
Today I'm showing an industrial inspired Birthday card made for my dear sister in law.  


I started by making my background. I sprayed distress oxide sprays walnut stain, ground espresso and pumic stone all over the front side of the Tim Holtz stencil industrial and then used it to make a print on white gloss paper. I think it looks cool with the letters and numbers backwards. I saw Tim Holtz do this on one of his FB live and wanted to try it. You can watch his demo here (this technique is shown 42 minutes into the demo). My intension was to then use distress micro glaze on this but liked the way it looked so just left it as it is and just stamped some numbers and words using archival ink rotting soil and stamps from the sets mail art and correspondence on top.
I cut some layers to put behind my background; one silver metallic kraft (sanded and slightly inked with distress ink ground espresso) and one plain white mixed media paper. The base layer is corrugated packing then I have a panel of white mixed media paper and a panel of design paper from the abandoned paper stash from Tim Holtz. The latter is sanded around the edges and cut in the bottom corner on the left hand side to fit with the stamping I did on the mixed media paper panel. The folded base is made with watercolor paper, 300g (140lb) and I have glued it on the back side of the corrugated packing panel. It does not show at all from the front side fo my card.
The star trim is die cut in silver metallic kraft. I sanded it before die cutting and then inked with distress ink ground espresso. I die cut the trinket frame in chipboard and covered it with grit paste and let dry. Then used my distress ink tool with distress ink ground espresso all over it. The tickets are stamps, stamped in archival ink rotting soil and die cut with matching die from Tim Holtz.  
The bottle caps are sanded before glued in place as well as the quote ship. The latter was also inked on the edges using distress ink ground espresso. The metal text decorations are colored with distress crayons picket fence and the metal clip at the top with distress crayons picket fence, gathered twigs and walnut stain as well as the pen nib. The baseboard doll is sanded and then inked around the edges using distress ink ground espresso and I used distress marker to color his face and tie.
Thank you for stopping by
Lisa


I will try my luck in the following challenge


Products used 
From Tim Holtz
Dies: trinket frames, ticket booth, star trim
Stamps: mail art CMS339, correspondens CMS225, ticket booth CMS337
Stencil: industrial THS 051
Idea-ology: pen nib, metal clip, quote ship, hardware head, baseboard doll, transparent wing, game spinner, date dials, bottle caps, index clip, word band, quote tokens
Distress ink ground espresso
Distress crayon picket fence, gathered twigs, walnut stain 
Distress marker ripe persimmon, tattered rose
Distress spray walnut stain, ground espresso, pumic stone (if I remember correctly)
Paper stash abandoned
Metallic jewels kraft, silver
Gloss paper

Other
Corrugated packing
Mixed media paper, Canson (140g)
Watercolor paper, Canson (300g)
Hemp cord


onsdag 23 oktober 2019

Trick or treat

Hello and welcome
I have colored one of the handsome fellows from the Tim Holtz monster reunion stamp set using my prismacolor pencils and made this Halloween card. I haven't done one for years. And I would like to play along in the Simon says stamp monday challenge the theme is spooky.

I started by making the background using black metallic kraft from Tim Holtz (TH). I run it trough my cuttlebug using the 3D impresslit folder foundry (a favorite of mine). I then sanded the surface when still in the folder the same way Tim Holtz showed in his latest facebook live show and inked it with distress ink vintage photo to give it a warmer tone to go with my colored image. I then cut two panels to put behind my background, one using watercolor cardstock colored with oxide spray pumice stone and one orange core'dination cardstock with sanded edges. 


I then made the larger orange panel. It's a sanded orange metallic kraft sheet colored with vintage photo. I had to piece out this panel to fit behind my layers as the metallic sheet is 8x8 inch (20x20 cm) and my card is 6,3x11 inch (16x28 cm). I stamped spider web from the set tangled webs with archival ink jet black on the upper two corners.


I then diecut the letters for 'trick or treat' using the handmade alphabet. They are diecut in both chipboard and black metallic kraft treated the same way as my background above using the same 3D folder and ink. I then glued the metallic kraft letters onto the chipboard letters. The word 'or' is made with the thinlits die alphanumeric label.


The spiders are diecut in black alcohol ink paper. They are from the thinlits die set frightful things as well as the paper pumpkins, the witch hat and the spider web. I have used orange core'dination cardstock for my pumpkins and the spider web and for the back side of the pumpkins I used black sanded metallic kraft colored with distress ink vintage photo. I wanted some texture on the witch hat so used texture paste graphite from Finnabair. It dries almost black and is a little sparkly and when completely dry I used archival ink monarch orange to give it a touch of orange. Doesn't he look great in the witch hat!? What don't you do for a little candy....lol 

The black house is made with the thinlits die set ghost town. I colored watercolor cardstock with black gesso and when dried I diecut the house and cut a piece of orange metallic kraft to put behind. 

The candy is made with the thinlits die set santa's helper, diecut in black metallic kraft and treated with the same procedure as my background and letters above using the 3D folder and distress ink.

At the bottom of my card I have stamped a sentiment from the Tim Holtz/Simon Says Stamp/Stampers Anonymous stamptember 2019 stamp set (I'm so happy I got this set, they are sold out now and will not come again). If you have the monster reunion set and/or the stamptember set you know all these stamps comes with a sentiment each and the one I used belong with the funny bird in the stamptember set. Love the hardware heads, use them all the time. Here one on each side of the sentiment.


The image is colored with my Prismacolor pencils and fussy cut.

I decorated with some TH idea-ology pieces: metal decorations, mini pumpkins, mummy cloth, fringe and broomstick. The metallic pieces are colored with distress crayons rusty hinge and black sooth as well as the pumpkins and the broom stick. To color the mummy cloth I used distress oxide spray rusty hinge.

The base is orange cardstock with a silver metallic corrugated cardstock from stash on top. I have another panel behind the larger orange metallic kraft panel made with watercolor paper and distress oxide spray pumice stone.

Thanks for stopping by
Lisa


I would like to enter the following challenge


PRODUCTS USED
Tim Holtz
stamps: CMS346 tangled webs, CMS381 monster reunion, stamptember 2019
dies: santa's helper, ghost town, handmade alphabet, alphanumeric label, frightful things
3D impresslits folder foundry
core'dination cardstock, orange
metallic jewel kraft, black, orange
black alcohol ink paper
distress ink vintage photo
distress oxide spray pumice stone
distress crayons black sooth, rusty hinge
idea-ology: adornment halloween accent (the bat), broomstick 2019, fringe, mummy cloth, pumpkin pieces, tokens halloween, tokens halloween 2019, hardware heads

Finnabair
texture paste graphite

Ohter
orange cardstock 
silver metallic corrugated cardstock
watercolor cardstock, Canson
prismacolor pencils
archival ink jet black, monarch orange
chipboard 


torsdag 10 oktober 2019

The umbrella man

Hello and welcome
Now fall has arrived here in Sweden. I love this time of year, the colours are stunning and the air is crispy. I'm back again to show my design team project for Ally's Angels. A new challenge starts today and the theme is Anything goes. I have made a card using the umbrella man die from Tim Holtz.


To create this card I started by making the background using gloss paper and distress oxide sprays. I sealed the surface with distress micro glaze and wiped off with dry cloth then used a stencil from Tim Holtz (TH), texture paste and when completely dry I used distress crayons and distress inks to finish.


Behind my background I have one panel made with distress oxide spray black sooth on watercolor cardstock and another one made with oxide sprays on gloss paper. The yellow panel is core'dination cardstock and the black panel behind is alcohol ink cardstock that I just sanded lightly. Absolutely love the surface of this alcohol ink cardstock. The base is kraft and I have one panel of design paper from the TH new paper stash abandoned on top. I embossed parts of a text stamp from the TH set distinguished on the left hand side of the design paper and also on the upper part of the black alcohol ink cardstock.


I die cut the big tag in chipboard and colored it with black gesso then sanded it. The mini pocket watch and the star trim are both die cut in yellow core'dination cardstock and sanded. The umbrella man is die cut in core'dination cardstock and colored with black gesso then sanded. Love the matte surface from the gesso and the texture of the core'dination cardstock. Added some linen ribbon.


Metal decorations, quote chip and the etcetera trims are all from TH. To color the metal decorations I used black gesso and distress crayons ripe persimmon, walnut stain, wild honey and fossilized amber.


Thank you for stopping by
Lisa


Products used
Tim Holtz/Sizzix dies: mini pocket watch, umbrella man, tag, star trim

Tim Holtz/Ranger: 
- distress oxide sprays black sooth, rusty hinge, walnut stain, pumic stone
- distress crayons ripe persimmon, walnut stain, black sooth, wild honey, fossilized amber
- distress ink black sooth
- texture paste
- distress micro glaze
- white gloss paper
- black alcohol ink cardstock

Tim Holtz/Stampers Anonymous
- text stamp from the set CMS371 distinguished
- etcetera trim
- stencil THS012 measured

Tim Holtz idea-ology:
Stars, arrow, hardware heads, foundry, typed token, paper stash abandoned, linen ribbon

Embossing powder cappuccino from Sparkle N Sprinkle
Kraft
Watercolor cardstock
Core'dination cardstock, black with white core and yellow with white core
Chipboard
Black gesso


torsdag 26 september 2019

Genuine

Hello and welcome,
Thought I'd join the Simon Says Stamp Monday Challenge this week so made this card using Tim Holtz faceted heart die. The theme is stitch it.


I started by making my colored panels (the background and two more) using distress oxide sprays and heavyweight gloss paper from Ranger Ink. When completely dry I sealed the surfaces using distress micro glaze and wiped off with dry cloth. I also cut a panel of silver metallic corrugated cardstock and treated the edges with some black gesso to take away some of the shiny silver look. Then I colored corrugated cardboard with distress oxide sprays to use as a layer behind my background. As my base I cut a piece of silver metallic kraft stock and sanded the edges.


I created the bricks on my background using one of the dies in Tim Holtz mixed media 3 set to create a paper brick stencil and used it with texture paste mixed with distress paint black sooth and when completely dry also with some distress ink black sooth on top.


I created the heart by first using distress oxide sprays on gloss paper and then distress glaze as described above. I then die cut the heart with the Tim Holtz faceted heart die. I used distress ink black sooth for the edges. I found an old piece of metal wire to wrap around the heart and glued two small metal stars colored with distress crayon chipped sapphire on top. I also used the Tim Holtz 3D star trim to create some more decorations for my background and glued metal stars on top of them.


I sewed around the edges on one of my gloss paper panel and glued it on top of the silver metallic corrugated cardstock. I glued all my layers together before decorating my card.


The quote chip is from Tim Holtz as all the metal decorations except for the metal wire from stash. I have colored the metal decorations with distress crayon chipped sapphire.


Thank you for visiting
Lisa


Challenge

Products used
From Ranger Ink:
- heavyweight gloss paper
- oxide sprays black sooth, pumic stone, rusty hinge, faded jeans, fired brick
- distress ink black sooth
- distress crayon chipped sapphire, black sooth
- distress paint black sooth
- texture paste opaque matte
- distress micro glaze

Tim Holtz Idea-ology:
- stars, buckle, mini hardware pull, hardware heads, quote chip, metallic kraft-stock (silver)

Tim Holtz/Sizzix:
- faceted heart die, mixed media 3, 3D star trim

Corrugated cardstock, silver metallic
Corrugated cardboard

måndag 23 september 2019

Happy Birthday, Mom!

Hello and welcome,
Hope you had a great start of this week. I created this Birthday card for my mom using dies and a 3D folder from Tim Holtz. 


I started by making a background using oxide sprays. I then torn a page from an old dictionary in small pieces and added them onto my background using distress collage medium. I stamped randomly using stamps from Tim Holtz (TH) and used crackle paint on the edges. I cut out pieces of design paper from a TH paper pad and glued onto my background.


On top of my background I have a panel I created using watercolor paper and oxide sprays. I then used the 3D embossing folder botanical and also distress ink ground espresso and distress crayon brushed pewter. I made a panel with corrugated cardboard colored with the same distress ink and crayon as above. I have used the 3D embossing folder star trim to create the small star border that you could see a small part of close to the upper right corner of my card. I sanded the border and used distress crayons to finish.

My next panel is made using metallic kraft stock, the stacked postage die to cut a rectangle and then the 3D folder botanical again. I used distress paint and distress crayons in black soot on top. Then I made the pocket for the flowers using the die gift card bag. I made the pocket out of watercolor paper and colored it with oxide sprays and then sanded the edges and used the 3D folder botanical (again) and distress crayon brushed pewter on top.


The flowers and leaves are made with the TH dies wildflower stems 1 and garden greens and again I have used metallic kraft stock. I glued one idea-ology railhead in the center of each flower. The buckle, paper doll and wings are also from TH. I colored the dress and bow on the paper doll with my old Promarkers. 

To create the big bow I used an older TH die, bow-tied, and mixed media paper colored with distress oxide sprays spun suger, wilted violet and pumic stone and some distress ink ground espresso for the edges. The sweet little heart is from TH too and the lace is made with the die crochet cut out in mixed media paper and colored only with distress crayon brushed pewter.

I die cut the letters for 'MOM' using chipboard and the TH deco die and colored them using the same oxide sprays as for the bow and a touch of distress ink ground espresso for the edges. The quote chip 'make a wish' is also from TH.

The base is white cardstock, folded to create the inside of the card, and does not show at all from the front side. I then have a panel of purple corrugated cardstock and on top of that a panel with brown kraft cardstock and a panel of metallic kraft stock. I then glued my oxide spray background panels I described above on top of this. The card is 20,5x15 cm (approx. 8x6 inches). 

Thanks for stopping by
Lisa


Products used 
Tim Holtz/Sizzix dies: crochet, deco, gift card bag, garden greens, stacked postage, wildflower stems 1, bow-tied

Tim Holtz/Sizzix: 3D impresslits folder: botanical, star trim

Tim Holtz/stampers anonymous: CMS339 Mail art

Tim Holtz idea-ology: buckle, gumdrop heart, nailheads, paper doll, transparent wing, chit chat sticker

Tim Holtz: metallic kraft stock silver

Tim Holtz/Rangers:
-Distress ink black sooth
-Distress oxide spray ground espresso, walnut stain, vintage photo, pumic stone, spun sugar, wilted violet
-Distress crayon brushed pewter, black sooth
-Distress paint black sooth
-Collage medium matte


-Corrugated cardboard
-Corrugated cardstock
-Chipboard
-Paper from old dictionary
-Crackle paint, DecoArt
-Watercolor paper, Canson
-Mixed Media paper, Canson


tisdag 10 september 2019

Limited edition

Hello and welcome,

A new challenge starts today at Ally's Angels and the theme is anything goes. I've made this black and yellow masculine card with lots of cogs. 


I started by making my background for the cogs. I cut a panel of watercolor paper and colored it with distress oxide squeezed lemonade. I then used the 3D embossing folder mechanics and distress crayon black sooth. I finished by cover the whole piece with crackle glaze and when completely dry some more black soot crayon.

I made the two horizontal black panels by using watercolor paper and black gesso, sanding the whole surface and then put a mix of grit paste and black gesso on top for texture. Just love the matte look.


I die cut the pipes, cogs and viewer in chipboard using the pipeline, gadget gears, industrial and voltage dies from Tim Holtz. All the black pieces are made the same way as my black horizontal panels above and I made a few pieces yellow using white gesso, texture paste, oxide spray squeezed lemonade and then finished with some black sooth crayon on top.


I colored watercolor paper with distress oxide squeezed lemonade and stamped the hat and the collar from the stamp set distinguished in black using Archival ink and then fussy cut.

Metal embellishments are idea-ology except maybe the metal knob placed in the middle of the small cog. I think it's from Finnabair but I'm not sure. I totally love the new TH idea-ology hardware heads, I use them everywhere, lol. The quote chip limited edition is also TH and it's colored with some oxide spray squeezed lemonade.


The panels behind my 3D embossed background are two black ones, both made with watercolor paper and black gesso then sanded. Then of course I can't do without a layer made of corrugated cardboard.  It's made yellow with white gesso and oxide spray squeezed lemonade. When it's wet from the gesso I first flatten and then curl the edges some before spraying it with oxide spray. The crackled panel is made with watercolor paper, gesso, white crackle paint, distress oxide squeezed lemonade and then some distress crayon black soot. 

Thanks for stopping by
Lisa


Products used
Tim Holtz/Sizzix dies: pipeline, gadget gear, voltage, industrial
Tim Holtz/Sizzix 3D embossing folder: mechanics

Idea-ology by Tim Holtz: typed token, star, hardware heads, measurement, mini hardware pull, quote ship

Stamp set from Tim Holtz/Stampers Anonymous: distinguished 

Tim Holtz/Ranger: distress oxide squeezed lemonade, distress oxide spray squeeze lemonade, distress crayon black sooth, grit paste, texture paste

Metal embellishment "knob" from (Finnabair?)
Crackle paint and crackle glaze from DecoArt
White gesso
Black gesso
Watercolor paper, Canson 300g
Corrugated cardboard
Chipboard


lördag 10 augusti 2019

Asbjorn's garage

Hello and welcome,
I'm on my summer vacation and at the moment visiting the beautiful country of Norway. The card I’m showing today is for a friend who loves to spend time in his garage. He loves old cars and he owns an absolutely gorgeous hotrod from 1933 so my plan was to make a garage themed card for his Birthday.

It's also my design team project for Ally's Angels and the new challenge starting today. The theme is anything goes. There is a nice prize for the winner and the challenge runs for a month so you have plenty of time to enter.


I started by making the frame. I used one of the baseboard frames from Tim Holtz (TH) and covered it with gesso and when dry with white crackle paint. I die cut the small tag in watercolor paper, the pediment and the viewer in chipboard and treated them the same way as the frame. I then did the same way with the etcetera trims here used as a shelf below the frame. When completely dry I used just a little distress crayon hickory smoke and some water to make the crackles more visible.


I embossed and fussy cut one of the stamps from the TH stamp set road trip to use as a background inside the frame. I glued the viewer together with a hardware head in the middle of the stamp and glued it to the back of the frame. I also glued the tag in place on the side and let two charms hang from it with help of a jump ring.


All brown panels are made with watercolor paper (300g) and distress oxide sprays vintage photo, walnut stain and pumic stone. The edges are sanded. I made white panels to put behind each brown panel. I used two stencils from TH and one from Andy Skinner (oil). I embossed the tire tracks in white, it's also from the road trip stamp set. The oil drops are die cut in chipboard using the TH pipeline die and colored with distress inks ground espresso and black sooth.

When I had glued all my panels together I put the frame in place and the pediment on top. I then glued the etcetera trims just below the frame. Now I could start to decorate. I used two letters from idea-ology letterpress for Asbjorn's initials.  


I've used a lot of TH idea-ology like the stars, hardware heads, buckle, mini hardware pull, faucet knob and a paper doll. These are all favorites of mine and frequently used in my projects. I dig deep in my stash and found some other items to go with my project: screw, bulb, nut and a coil spring. I used white gesso to make them look distressed and go with my project. 


The car is from the TH stamp set elements of time and embossed in the colour cappuccino from Sparkle N Sprinkle. The car is in three layers. Beside the embossed one I stamped two more and fussy cut and glued them all together to get a thicker piece. It's then glued with 3d cushions. 

The base is made using the same watercolor paper as my panels and it's colored with distress oxide sprays both inside and on the back side.


Thank you for stopping by
Hugs, Lisa


Products used
Dies from Tim Holtz/Sizzix: tag, pediments, pipeline, voltage

From Tim Holtz/Ranger:
-distress oxide sprays vintage photo, walnut stain, pumic stone
-distress inks ground espresso, black sooth
-distress crayon hickory smoke

Tim Holtz/Stampers Anonymous:
- stamps from the sets Road trip CMS128 and Elements of time CMS038
- stencils: Schoolhouse THS011, Industrial THS051, Stitched THS099
- etcetera pinked trims chipboard 

Tim Holtz idea-ology: letterpress, mini hardware pull, hardware heads, buckle, faucet knob, stars, typed token, jump ring, frame, quote chip, paper doll

From stash: charms, bulb, nut, coil spring, small measurement

Stencil from Andy Skinner (oil)

White gesso from Finnabair
White crackle paint from DecoArt
Watercolor paper from Canson 300g
Embossing powder: white from WOW and cappuccino from Sparkle N Sprinkle