onsdag 8 april 2020

Using distress micro glaze as resist

Hello and welcome,
After watching Tim Holtz FB live demo's with great interest I decided to try the technique using distress micro glaze as resist. If you want to watch his demo's you can find them on his blog HERE.


So I took my distress micro glaze and used it with my distress tool through the stencils schoolhouse and industrial on distress mixed media heavystock. I then sprayed with weathered wood, tea dye and pumic stone distress oxide sprays, sprayed with water and used my heat tool to dry everything. The glaze resist the oxide spray, very cool! I added a touch of ripe persimmon distress oxide ink using the distress tool on a few areas and again sprayed with water and heat dried. I made som splotches using distress oxide spray ground espresso. I then used my distress tool and distress ink ground espresso around the edges but decided it looked too plain so added black sooth distress crayons around the edges as well. I almost always use my fingers to apply distress crayons. I decided to use my background to make a card and to use more orange, a colour that I hardly every use.


To make the stars I die cut the big star die in chipboard. Covered the stars completely in black gesso. I then painted them using ripe persimmon distress paint but wiped off some of the paint using a dry cloth before it dried and then sprayed them using tea dye distress oxide spray and quite a lot of water and put them aside to dry. Just love the way they turned out.


I die cut the big circle from the steampunk die and covered it with black gesso. I then painted it with ground espresso distress paint and wiped off with cloth before spraying them with tea dye distress oxide spray, lots of water and let dry. I then used tea dye and rusty hinge distress crayons. I did the same to the bolts. The small circle is painted with ripe persimmon distress paint and finished with a touch of black sooth distress crayons.


The metal stars are covered with distress collage medium matte and then ripe persimmon distress paint and then used some black sooth distress crayon. The black numbers in the upper right corner is a remnant rub.

The background is matted on to a black kraft panel with sanded edges. I then have another kraft panel in a greenish colour with sanded edges and then corrugated packing painted with ripe persimmon distress paint and the base is black kraft with sanded edges.

Thanks for the visit
Lisa


Tim Holtz products used
distress mixed media heavystock
distress oxide sprays: weathered wood, tea dye, pumic stone, ground espresso
distress paint: ground espresso, ripe persimmon
distress oxide ink: ripe persimmon
distress ink ground espresso
distress crayons: black sooth, tea dye, rusty hinge
distress micro glaze
stencils: schoolhouse, industrial
dies: steampunk parts, stars
idea-ology: stars
black kraft, green kraft
distress collage medium matte
remnant rubs Halloween

Other
corrugated packing
chipboard
black gesso


söndag 16 februari 2020

Lilleman - the crazy dog

Hello and welcome to my blog,
I was asked to make a project with a dog on for my best friends hubby, Peter. So I have colored up one of the crazy dogs by Tim Holtz. I chose the one that was most alike Peter's dog Lilleman who is a Cane Corso Mastiff. He is colored using Prismacolor pencils as well as the bow tie and the hat from the stamp set crazy things also by Tim Holtz (TH). 


I chose to make a tag instead of a card this time and I have used the mini etcetera tag from Stampers Anonymous. I started by covering the tag completely in white gesso and let dry. Then I used opaque texture paste thru the stencil decayed in some areas and covered the rest of the front side of the tag with white crackle paint. When completely dry I painted the whole tag using distress paint weathered wood followed by distress ink walnut stain in some areas followed by distress paint broken china and black sooth and distress crayons walnut stain and black sooth. I also used a little bit of water. I then used some baby wipes to remove paint in some areas. When I was happy with my background I stamped with one of the background stamps from the new Professor 2 set by TH using archival ink jet black.


I die cut the planks using woodgrain paper from Ranger Ink and the die planks by TH and then used distress oxide sprays vintage photo and pumic stone and distress crayons broken china, walnut stain and black sooth to paint them. I then die cut more planks and glued them together as I wanted the planks thicker. On one of the planks I have used the TH die claw marks. The nuts are die cut in chipboard (I used the voltage die by TH) and painted using distress paint broken china. I then sanded the edges and used the distress tool and distress ink walnut stain to ink the edges. The idea-ology mini hardware pull is painted with distress paint broken china and distress crayons black sooth and walnut stain. 


The bones at the top of my tag are die cut in chipboard using the skull die by TH. They are painted using distress paint broken china and distress ink walnut stain and sanded.


For the sentiment I used woodgrain paper and distress oxide spray pumic stone and hickory smoke followed by distress crayons walnut stain and black sooth and when completely dry I embossed the 'beware' stamp from the stamp set mr bones by TH in a dark red color from Sparkle N Sprinkle. On each side of the sentiment I have an idea-ology hardware head painted with distress crayons walnut stain. 


I added an idea-ology hinge clip on the side and used the chain from a swivel clasp, a jump ring, a mini book ring and a hitch fastener. All these parts are painted with distress crayons black sooth and the hinge clip with distress paint broken china and walnut stain as well.

Thank you for stopping by
Lisa


CHALLENGE


PRODUCTS USED
Tim Holtz
- mini etcetera tag
- dies: planks, skull (the bones), voltage (the bolts), claw marks
- stamp sets: crazy things (bow tie and hat), crazy dogs, bones (the sentiment), the professor 2 (background stamps)
- idea-ology: mini hardware pull, hardware heads, hinge clip, swivel clasp (chain), book ring, jump ring, hitch fastener 
- stencil: THS129 decayed
- distress ink walnut stain
- distress crayons black sooth, walnut stain
- distress paint broken china, black sooth, walnut stain
- distress oxide spray pumic stone, hickory smoke, walnut stain, broken china, vintage photo
- woodgrain paper
- opaque texture paste
- archival ink jet black
- distress tool

Other
- white gesso, Finnabair
- prismacolor pencils
- crackle paint, DecoArt
- string from stash
- baby wipes
- chipboard
- dark red embossing powder from Sparkle N Sprinkle


måndag 10 februari 2020

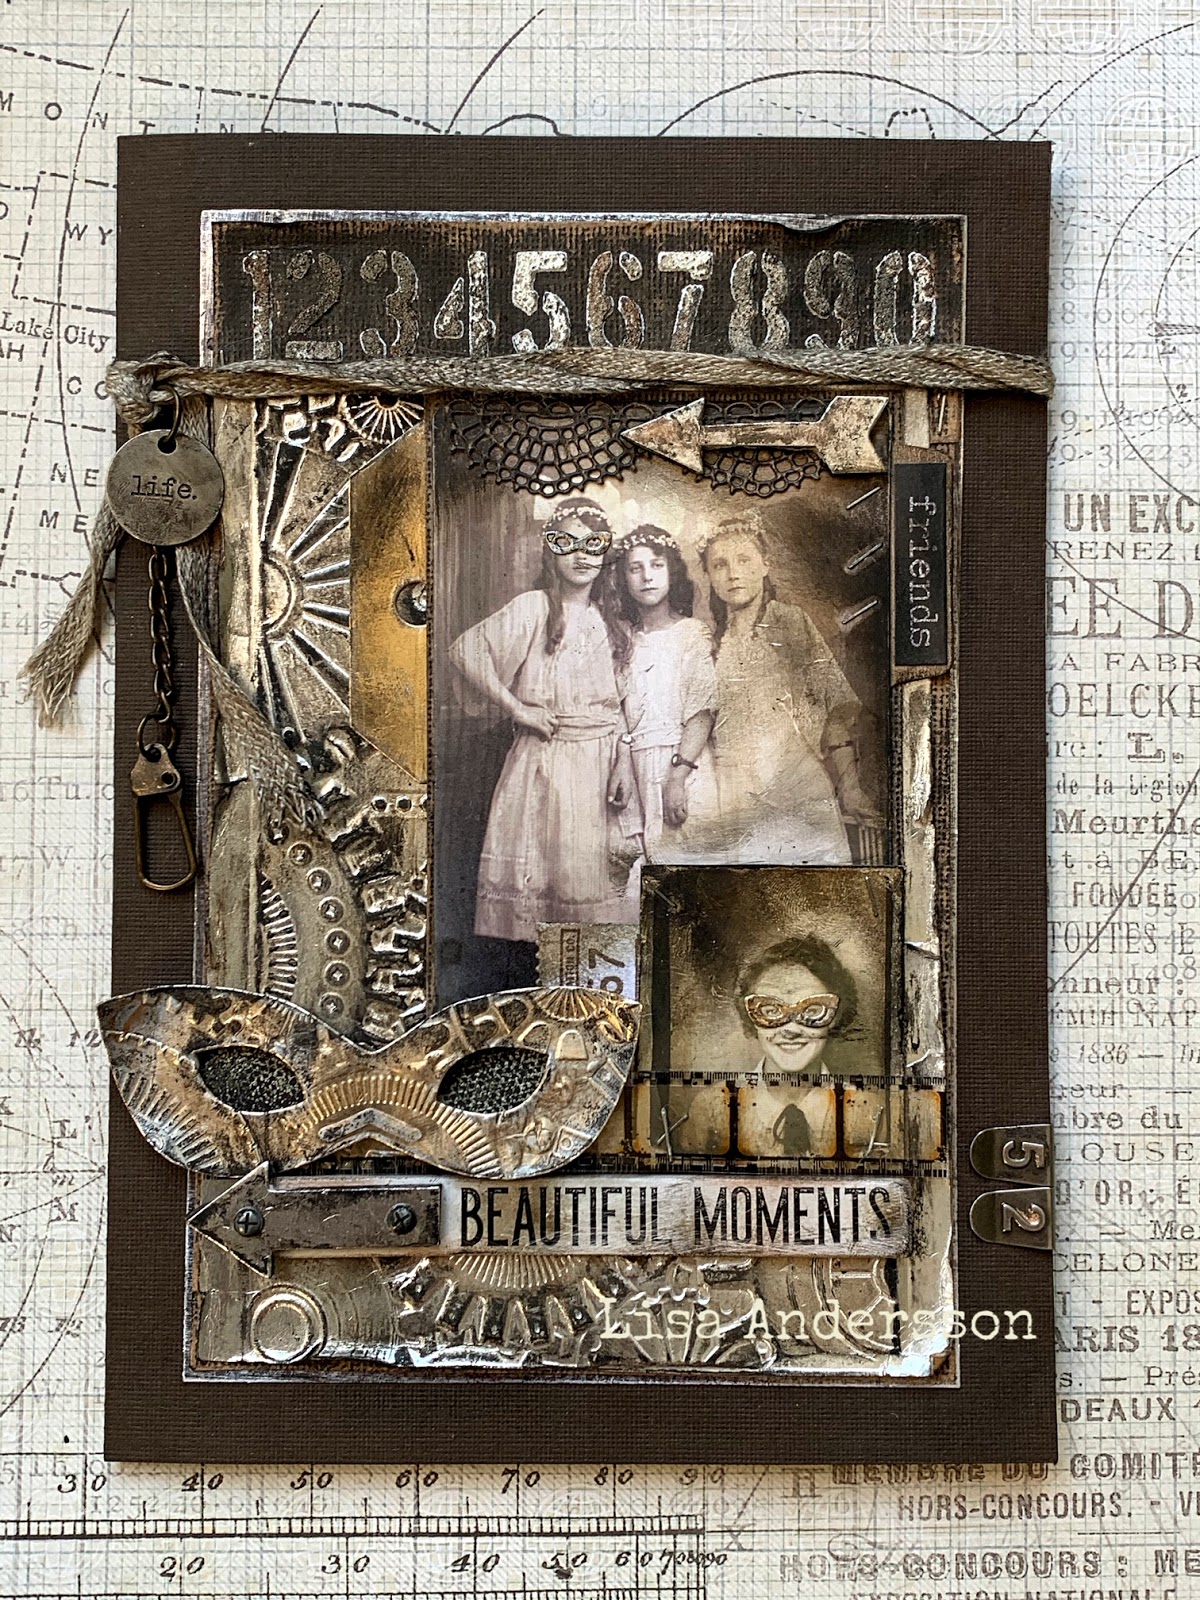
Beautiful moments

Happy Monday,
Welcome to a new challenge at Ally's Angels and once again the theme is anything goes. 
I have made this card for a friend. 


I wanted to use this photo from Tim Holtz idea-ology found relatives and also one from the photo booth package. I have had them for a while and thought it was time using them. The photo is followed by a panel of sanded black kraft and I have used the tiny attacher to staple them together, just because I love the look of staples. The tiny masquerade masks are die cut in champaigne metallic kraft and painted with black sooth distress crayon. The lace is die cut using the chrochet die and black kraft and then sanded. I also die cut arrows from the artful arrow die in silver metallic kraft and as I wanted the arrows a bit thicker I die cut them in chipboard as well and glued them together before sanding them and painting them with black sooth, gathered twigs and antiqued bronze distress crayons.


I die cut the file tab in kraft and glued a sticker from idea-ology big chat to it and used black sooth distress crayon and blended out with my fingertip. My background is made of silver metallic kraft. I sprayed a little bit of water on the kraft before running it through my cuttlebug three times using the 3D folder mechanics, so the paper wouldn't break. I then sanded it and ran it through my cuttlebug once again and then used black soot, gathered twigs and antiqued bronze distress crayons to paint it.


I die cut the big tag in champaigne metallic kraft. The tag is sanded and painted using black sooth and gathered twigs distress crayon. I made a hole on the upper left side of the brown base so I could get the linen ribbon through and wrap it around the front of my card. Made a knot and used a jump ring so I could hang the swivel clasp and the typed token from the ribbon.


To create the row of numbers on top of my card I die cut the number die from the Tim Holtz mixed media 6 die set in 300g watercolor paper to create a stencil. I then used grit paste through the stencil and let dry completely before using black sooth, gathered twigs and antiqued bronze distress crayons to paint them. I sprayed with some water and used my fingertip to blend out.


The filmstrip is stapled in place using the tiny attacher and I die cut the big masquerade mask in champaigne metallic kraft and run it through my cuttlebug together with the 3D impresslits mechanics before sanding and painting it with black sooth and gathered twigs distress crayons. Behind the mask I have a piece of embossed black cardstock. To create this I have used frayed burlap distress embossing powder and the lace background stamp from Tim Holtz. I then cut small pieces to put behind the mask and used 3D tape for depth. I sanded the edges of the quote chip and used black sooth and gathered twigs distress crayons and then glued the arrow with two hardware heads onto the quote chip. Down at the right hand side I added two number clips, you can see them on the first photo above.

Behind my background I have a panel of black kraft with sanded edges followed by sanded silver metallic kraft followed by my base which is a brown cardstock folded to create the inside of my card.

Thanks for stopping by
Lisa


PRODUCTS USED

Tim Holtz
- dies: tag, masquerade, artful arrow, mixed media 6, crochet, file tab 
- 3D impresslits mechanics
- stamp set CMS348 ornate and lace
- idea-ology: found relatives, photo booth, typed token, hardware heads, linen ribbon, jump ring, swivel clasp, quote chip, filmstrip, clips, big chat
- metallic and blackout kraft
- distress crayons: black sooth, gathered twigs, antiqued bronze
- distress embossing powder: frayed burlap
- tiny attacher
- grit paste

Other
- brown and black cardstock from stash
- kraft
- Canson watercolor paper, 300g


söndag 26 januari 2020

Salvaged

Hello and welcome!

I was inspired by a stamp designed by Tim Holtz to make this card. Ever since the release of the Tim Holtz/Stampers Anonymous stamp set weird science last year I've been thinking about making a card using the thorax stamp from this set. At once when Tim showed this stamp set on FB live I had a plan for it; I wanted to colour the thorax image, cut it out and put a heart inside and create a card with the thorax and the heart as the focal point. Many month has passed since the release and now finally I had some time to play and try my idea. So here is my card, better late than never...


The thorax image is stamped on Canson watercolor paper 300gr using jet black archival ink and colored using my Prismacolor pencils. I used a scalpel to cut the image out and as I didn't have a small heart die or heart stamp to use I just used a scissor to cut a heart out by hand and then colored it using festive berries distress oxide spray and Black Sooth Distress ink.


For my background I used design paper from the Tim Holtz abandoned paper stash. I used another stamp from the weird science set and stamped randomly over the design paper. I then made a frame using a favorite of mine, the 3D embossing folder foundry and black metallic kraft. After running it trough my cuttlebug I sanded it and cut out the middle part with a scalpel creating the frame and then painted it using gathered twigs and black sooth distress crayons. I cut small pieces of the cut out embossed part and glued them onto my panel and used distress crayons to paint them as well. I almost always use my fingertips when working with the distress crayons and sometimes I use a little bit of water as well. 


I then mixed grit paste and pumic stone distress paint and used my fingertip to apply this on a few places on my embossed panel. I used some more gathered twigs and black sooth distress crayons to paint these areas and then used a small brush and quinacridone gold acrylic paint from DecoArt to paint some more areas to make it look rusty. I glued some idea-ology hardware heads to my embossed frame and painted them using distress crayons and also some quinacridone gold acrylic paint. I die cut random numbers and the letter z using the alpha numeric upper die and black kraft and glued them onto the panel on the upper left corner.


I mounted my embossed frame panel onto my background using 3D cushions to create some depth and then onto another panel of sanded black metallic kraft and behind another panel of design paper from the abandoned paper stash (same as my background) and behind that a panel of sanded black kraft. My base is created of black coredination cardstock with a pale orange core and sanded edges, folded to create the inside of my card.


The image is cut to separate the thorax from the gears. The gear part of the image is glued directly onto the background but for the thorax part I glued some small leftover chipboard pieces on the back side before gluing it onto the background to get some depth (I find this easier then using layers of 3D tape when the image has so tiny parts). I then glued the small hart in place inside.


I decorated my card with some more leftovers from the embossed panel together with some hardware heads on three sides of the embossed panel. The quote chip is sanded and painted with gathered twigs, black sooth and tea dye distress crayons and quinacridone gold acrylic paint and with hardware heads in the corners. The metal decoration word band on top of the embossed panel is cut to remove the loops and painted using gathered twigs, black sooth and tea dye distress crayons. 


The clock key, another favorite of mine, is die cut in chipboard and in black metallic kraft. I glued the kraft onto the chipboard and sanded it and painted it using gathered twigs and black sooth distress crayons and used the same mix of grit paste and pumic stone distress paint as above and some quinacridone gold acrylic paint as well.

Thanks for stopping by
Hugs, Lisa 


PRODUCTS USED

Tim Holtz
- weird science stamp set
- 3D embossing folder foundry
- clock key die
- alpha numeric tiny type upper die
- abandoned paper stash
- distress crayons: black sooth, tea dye, gathered twigs
- distress ink black sooth
- distress oxide spray festive berries
- distress paint pumic stone
- grit paste
- quote chip
- hardware heads
- word band
- black metallic kraft
- black kraft
- coredination cardstock black with pale orange base
- all the panels are cut using the big guillotine
- glass media mat

Other
- acrylic paint from DecoArt: quinacridone gold
- archival ink jet black
- canson watercolor paper, 300gr
- prismacolor pencils
- chipboard
- 3D cushions


fredag 10 januari 2020

Birthday card for Eva

Hello and welcome,
Hope you all had a wonderful Christmas and New Year. I'm back again with a new design team project for Ally's Angels. The theme is once again Anything Goes and I have made a Birthday card for a friend.


I started by applying Distress Grit Paste through Tim Holtz stencils Measured, Industrial and Decayed on a watercolor cardstock panel measuring 14,5x21 cm and when dry I sprayed with Distress Oxide Sprays Vintage Photo, Pumice Stone and Walnut Stain and finished with some Black Soot Distress Crayon blending out the colour with my fingertip.


The window is die cut in chipboard and colored with Walnut Stain and Black Soot Oxide Inks and to get some texture I used Distress Grit Paste blended with Distress Paint Weathered Wood and finished with Black Sooth Distress Crayon. I die cut the piece behind the window frame in Silver Metallic Kraft and sanded the edges. 


The Cityscape Skyline are die cut in Silver Metallic Kraft, sanded, and to create the ledge I used Pinked Trims from the Etcetera Collection. I applied a layer of white Crackle Paint from DecoArt and when dry I used my fingertip and Vintage Photo Distress Crayon together with a little bit of water to color the cracks.


The Faceted Heart is a favorite of mine and this time die cut in Silver Metallic Kraft and sanded. I glued Hardware Heads colored with Walnut Stain Distress Paint on three sides of the heart and to finish I just wrapped some metal wire from stash around it.

I die cut the number 50 in chipboard using the Handmade alphabet die and used Broken China Distress Paint to color them and when dry I used a touch of Walnut Stain Distress Crayon around the edges.
I then made the other panels to put behind my background. One panel is made of Brown Coredination Cardstock with blue core, sanded, and the other panel is corrugated cardstock colored with Walnut Stain and Black Sooth Distress Oxide Ink and Black Sooth Distress Crayon. The base is made with watercolor cardstock, folded and colored with Broken China Distress Ink on the front and the inside- and backside with my fave combo of Vintage Photo, Walnut Stain and Pumic Stone Distress Oxide Sprays.


I glued all my die cuts and decorations in place. All metal decorations are Idea-ology from Tim Holtz and I have used Broken China Distress Paint and Black Sooth Distress Crayon to color them. The Paper Doll and Wings are also Tim Holtz Idea-ology.

Wish you all a happy, healthy and creative year 2020
Hugs, Lisa


I would like to enter the following challenge
Simon Says Stamp Blog, Something New (I have used a for me new die from Tim Holtz - Window Frame)

PRODUCTS USED
Tim Holtz
Stencils: THS012 measured, THS050 industrial, THS129 decayed
Dies: Faceted Heart, Window Frame, Cityscape Skyline, Handmade Alphabet
Idea-ology: Etcetera Pinked Trims, Stars, Hardware Pulls, Hardware Heads, Adornments Foundry, Paper Doll, Wings
Distress Oxide Sprays: Vintage Photo, Walnut Stain, Pumice Stone
Distress Oxide Inks: Walnut Stain, Black Sooth, Broken China
Distress Crayons: Walnut Stain, Black Sooth
Distress Paint: Broken China, Weathered Wood
Distress Grit Paste
Silver Metallic Kraft

DecoArt
Crackle Paint

Canson
Watercolor cardstock, 300g

Other
Chipboard and Metal Wire from stash

söndag 10 november 2019

The professor

Hello and welcome,
Today I'm showing this card made for my wonderful friend and Ally's Angels teamie Mariann. I wanted to surprise her with a steampunk Birthday card and I have used the professor stamp from Tim Holtz (TH) along with some other cool TH details. 

This is also my design team project for Ally's Angels and the new challenge that starts today. The theme is anything goes. My teamies makes the most beautiful cards so pop over and have a look.


My card is 15,5x21,5 cm (approx. 6x8,3 inch). The professor is made with the stamp set CMS373 from Tim Holtz. I started by coloring gloss paper using walnut stain, vintage photo, pumic stone and rusty hinge oxide sprays and then used distress micro glaze on top and wiped off with dry cloth. When dry I stamped the professor with Archival ink jet black and fussy cut. The black hat is from the same stamp set as the professor and I stamped it onto black alcohol ink paper using archival ink monarch orange. It leaves just enough colour for me to see the lines to be able to fussy cut the hat. I then run it through my cuttlebug using the foundry 3D embossing folder and then used a 3D cushion to glue it in place.
I die cut the steampunk parts in chipboard and used black gesso, sanded the edges and colored the edges with arhival ink monarch orange. I then die cut the cogs also in chipboard and colored them with archival ink rotting soil, vermillion and monarch orange. I used a little distress ink ground espresso on top before sanding them. I have also used acrylic paint from Deco Art. I just used a small brush and the color quinacradone gold to give the pieces an even more rusty color. I treated all the bolt heads the same way. 
The clock behind the professor is a stamp from the set distinguished stamped onto kraft, fussy cut, inked with distress ink ground espresso and distress collage medium on top. The ribbon is colored with archival ink jet black and rotting soil then used some oxide spray rusty hinge on top. The buckle is from Tim Holtz and the bolt heads are die cut and treated the same way as the other bolt heads above. 
All metal decorations are Tim Holtz idea-ology and colored with distress crayons.

To create the background I used design paper from Tim Holtz's paper pad abandoned. I cut two panels of this paper and sewed around the edges with my sewing machine and used distress ink black sooth through the stencil schoolhouse (that's the bigger letters just behind the professor, the smaller letters on the left hand side is the design paper). I had a left over piece from the ribbon so glued it on the upper part of the background panel. 


For my other layers I used black metallic craft and sanded the edges, grey core'dination cardstock and corrugated cardstock. The latter was actually mint green from the beginning, I had run out of the brown kraft ones so I have colored it with distress paint tarnished brass, walnut stain and distress ink black sooth. Behind I have a layer of corrugated packing colored with oxide spray rusty hinge and used distress black sooth for the edges. The base is made with watercolor paper wish I also folded to create the inside of the card. To get the black matte surface I used black gesso and then sanded the edges. The inside and back side is colored with distress oxide sprays, but have no photos to show.

The happy birthday sentiment is embossed in the color tea dye on black alcohol ink paper and fussy cut. Love the black alcohol ink paper. The matte surface is fantastic.

Thank you for stopping by and thank you all who leave me such kind comments, they mean the world to me.

Hugs, Lisa


PRODUCTS USED

From Tim Holtz
Dies: cogs, steampunk parts, foundry 3D impresslit
Stamps: CMS373 The Professor, CMS371 Distinguished
Stencil: THS011 Schoolhouse
Idea-ology: ribbon, mini hardware pull, hardware heads, measurement, buckle, wheel, pen nib
Distress oxide spray rusty hinge, pumic stone, walnut stain, vintage photo
Distress ink black sooth, ground espresso
Distress crayons black sooth, tea dye, gathered twigs, rusty hinge
Distress embossing powder tea dye
Metallic kraft, black
Core'dination cardstock, grey

From Ranger Archival ink jet black, monarch orange, rotting soil, vermillion

From DecoArt
Acrylic paint quinacridone gold

Other products
Corrugated cardstock
Corrugated packing


lördag 9 november 2019

Curiosity

Hello and welcome,
Today I'm showing an industrial inspired Birthday card made for my dear sister in law.  


I started by making my background. I sprayed distress oxide sprays walnut stain, ground espresso and pumic stone all over the front side of the Tim Holtz stencil industrial and then used it to make a print on white gloss paper. I think it looks cool with the letters and numbers backwards. I saw Tim Holtz do this on one of his FB live and wanted to try it. You can watch his demo here (this technique is shown 42 minutes into the demo). My intension was to then use distress micro glaze on this but liked the way it looked so just left it as it is and just stamped some numbers and words using archival ink rotting soil and stamps from the sets mail art and correspondence on top.
I cut some layers to put behind my background; one silver metallic kraft (sanded and slightly inked with distress ink ground espresso) and one plain white mixed media paper. The base layer is corrugated packing then I have a panel of white mixed media paper and a panel of design paper from the abandoned paper stash from Tim Holtz. The latter is sanded around the edges and cut in the bottom corner on the left hand side to fit with the stamping I did on the mixed media paper panel. The folded base is made with watercolor paper, 300g (140lb) and I have glued it on the back side of the corrugated packing panel. It does not show at all from the front side fo my card.
The star trim is die cut in silver metallic kraft. I sanded it before die cutting and then inked with distress ink ground espresso. I die cut the trinket frame in chipboard and covered it with grit paste and let dry. Then used my distress ink tool with distress ink ground espresso all over it. The tickets are stamps, stamped in archival ink rotting soil and die cut with matching die from Tim Holtz.  
The bottle caps are sanded before glued in place as well as the quote ship. The latter was also inked on the edges using distress ink ground espresso. The metal text decorations are colored with distress crayons picket fence and the metal clip at the top with distress crayons picket fence, gathered twigs and walnut stain as well as the pen nib. The baseboard doll is sanded and then inked around the edges using distress ink ground espresso and I used distress marker to color his face and tie.
Thank you for stopping by
Lisa


I will try my luck in the following challenge


Products used 
From Tim Holtz
Dies: trinket frames, ticket booth, star trim
Stamps: mail art CMS339, correspondens CMS225, ticket booth CMS337
Stencil: industrial THS 051
Idea-ology: pen nib, metal clip, quote ship, hardware head, baseboard doll, transparent wing, game spinner, date dials, bottle caps, index clip, word band, quote tokens
Distress ink ground espresso
Distress crayon picket fence, gathered twigs, walnut stain 
Distress marker ripe persimmon, tattered rose
Distress spray walnut stain, ground espresso, pumic stone (if I remember correctly)
Paper stash abandoned
Metallic jewels kraft, silver
Gloss paper

Other
Corrugated packing
Mixed media paper, Canson (140g)
Watercolor paper, Canson (300g)
Hemp cord